 Scenery

As good photographers know, one of the easiest ways to destroy the illusion that the layout is a part of the real world is to have "clutter" [EXPLANATION] (such as railroad artwork, collection shelving [EXAMPLE], or stacked train boxes) within the line of vision. While valances are helpful (as they also eliminate overhead lighting glare), you really should be putting skyboards behind all your scenes, and if possible making them tall enough that the top is out of your normal line of sight. Ideally even distant walls across an isle should be either black or duck-egg blue, and all windows and fixtures should be covered in a flush way (removable panel?) that blends in with the wall.
Although Hi-Rail quality scenery modeling is not the focus of this website (and we in fact encourage persons interested exclusively just in Operating trains to skip modeleling, and join a club or have a layout built for them [EXAMPLE] to their specifications), at least a bare-bones minimum amount of scenery is required to make the layout more than just a "plywood prairie". In this context, creating scenes using semi-scale toy train structures [EXPLANATION] (including many toy "accessory" structures) can often be adequate. Suitable custom structures can be easily built using Papercraft. Although most structures should be at a true 1:48 scale (especially human-sized elements such as doors and stairs), scales up to 1:43 or down to 1:64 (e.g., many Plasticville / K-Lineville offerings) can be incorporated selectively for unobtrusive scenery that exists in various sizes, such as telephone poles.
The layout builder should give careful consideration to selecting a distinct architectural and branding style for their railroad owned structures, and apply it with consistency. This is to reflect that individual prototype railroad purchasing departments usually standardized on building design [EXPLANATION] and rollingstock fleet purchases for an entire railroad division (to both allow bulk purchasing and to ease the burden on the maintenance department).
Any scratch-built structures need only meet a serviceable rough approximation [EXAMPLE] of the real thing. They must also be durable enough to be easy to clean [EXPLANATION] (TIP: Shield your layout with a curtain to keep dust away.). Space of course is the limitation to your layout, but you should never compromise the overall ambiance of the layout just to squeeze in more track. A layout to be effective as a representation of the real world must leave ample room for scenery (of which trackside railway structures are only a very small part).
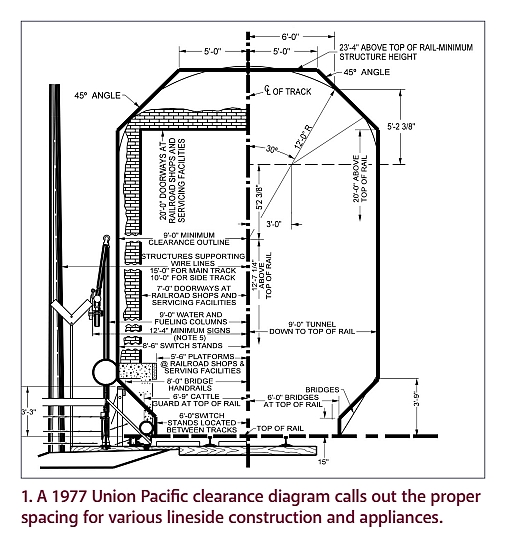
Regardless of how little horizontal space may be available for track, you will most often have plenty of vertical space. Use this third dimension to your advantage when developing a track plan on your layout. Even in a tight urban setting tracks can pass over each other, or be grade separated from roads. Overhead layout sketches alone are often visually misleading in regards to how a scene will actually look when built, so during layout planning also draw a few cross-section profiles [EXPLANATION] to better visualize the spatial relationship between your track, structures, and scenery.
Vertical space usage also applies to railroad serviced buildings. In the pre-computer era keeping track of lading was very paperwork intensive, requiring hoards of file clerks. It was not uncommon for example for a warehouse building to also include a floor or two of offices above [EXAMPLE] the warehouse floor.
Streets have been laid by humans before there were cars, trains, or even most structures. Streets used by automobiles have become ubiquitous since the Great War, and require a safety guard of some sort when they cross railroad tracks at grade. Streets are typically bi-directional, but can also be divided one-way thoroughfares [EXAMPLE]. Although brick is still occasionally found, it has been mostly replaced with asphalt or concrete paving [EXPLANATION] (both commodities that can be hauled by railroads), and highways are now marked with paint in an era specific [EXPLANATION] standardized manner.
Trackwork is scenery also. Besides just simulating the required Track Ballast [EXPLANATION], surround the track with congruent details such as signaling and communications infrastructure.
Note: Always model a signaling system on your layout. Even if they are just unworking scenery items, they are as visually necessary for the layout as the ties are in the track. The good news is that each railroad determines the kind of signals [EXAMPLE] that they employ, which gives freelancers a license to use whatever physical signal style, and atypical signal head aspect display, that they desire (just make sure that you describe them in your Rulebook).
Railroad serviced industries, as with railroad infrastructure buildings, are necessary to keep a railway in business; but ideally they should be secondary features in the greater scene behind scattered gear [EXPLANATION], landscape features [EXPLANATION], non-railroad structures [EXPLANATION], and trees (TIP: suburban tree stumps being hauled away would make a unique gondola load). Loading docks hold particular interest on a model railroad, and if employing "Suggestive Omission" [EXPLANATION], can stand alone without the associated warehouse. Customer loading docks can be made especially interesting if their Loading Point [EXAMPLE] is built in an intriguing manner, or if a dock (typically only a covered dock) is being used for temporary goods storage [EXAMPLE].
Benchwork depth available for scenery may be lacking, so scene depth savings can be realized through placing industries as building flats against a wall (ideally garnished with some color highlights and protrusions), or by using shallow structures [EXPLANATION]. Varying structure (and building accouterment) heights adds considerable visual interest. Forced perspective through scale change is another technique, but try not to reduce foreground 3d scenery size below 1:48th scale (O-scale), or background 3d scenery size below 1:64th scale (S-scale). Never should anything of a scale greater than 1:45th appear on the layout (even if they are official Lionel accessories).
Modeling building interiors is popular, and may even be necessary if the interior is illuminated. There are many modeling techniques that will give the illusion of a fully detailed interior without everything inside actually having to be modeled. However if you do make a fully detailed interior, leave a way for visitors to appreciate your artistry.
More important than detailing the inside of a building is detailing its outside. Outsides are always in view, and are a major contributor to making a building seem believable. Whenever you are on a walkabout and see an exterior of interest, take a Documentary Photograph [EXPLANATION]. This way you can recall exactly how it looked when trying to add it to your layout.
All content appearing on this webpage is FREE for personal use,
being either expressly created or previously posted as anonymously accessible public on the Internet.
No - Signups, Carts, Tracking, Cookies, or JavaScript